Custom fields
After creating custom post types and custom taxonomies, you'll need to add more details to your posts. For example, you'll need "date" and "location" for the "event" post type. Such details are called custom fields and that's the main thing that Meta Box does for you.
What are custom fields?
Custom fields, also called metadata, are arbitrary extra data attached to posts to provide more information about the posts.
Custom fields are a very important feature of WordPress and make WordPress a powerful CMS. You'll see custom fields everywhere, for example:
- On a hotel booking website: custom fields are used to add information for address, rating, or price
- On an e-commerce website: they're used to add details for price, quantity, or size. FYI, WooCommerce uses custom fields to store this data.
How to create custom fields?
To create custom fields, you should use the MB Builder extension to have an intuitive interface. This extension is already bundled in Meta Box Lite so you can use it right away.
Custom fields are organized in groups. Each group is displayed as a collapsible panel below the post editor.
Go to Meta Box » Custom Fields and click Add New. You'll see a screen to add fields to the group:
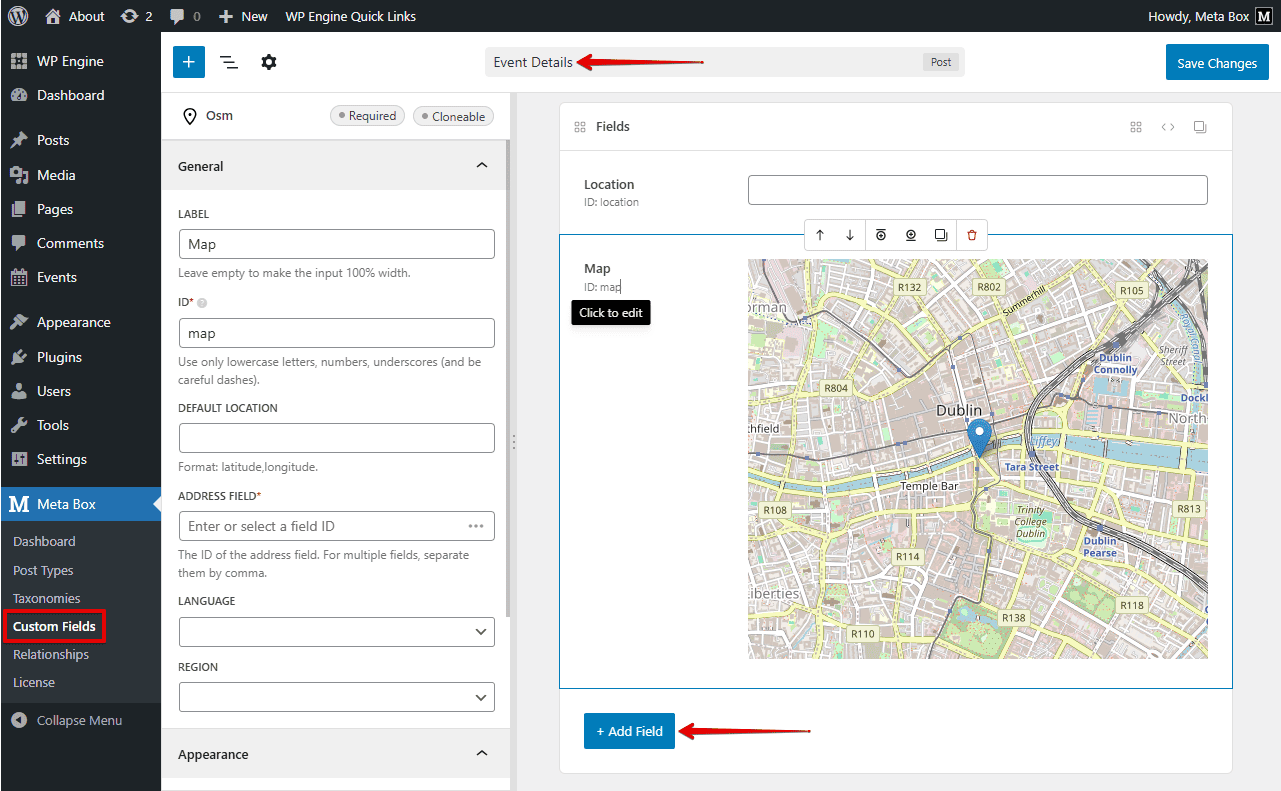
Enter the field group title at the top and then click the + Add Field button and select a field type to add to the group. Meta Box provides 40+ field types for all of your data types.
After that, a new field will appear in the field list. Clicking on the field bar will open the field settings panel in the left sidebar, where you can edit settings for the field, such as title or default value.
Each setting is clearly labeled, with tooltips available for extra guidance. To know more about field settings, please see this docs.
When finishing adding fields, click the Settings icon and select the post type where the fields are displayed for.
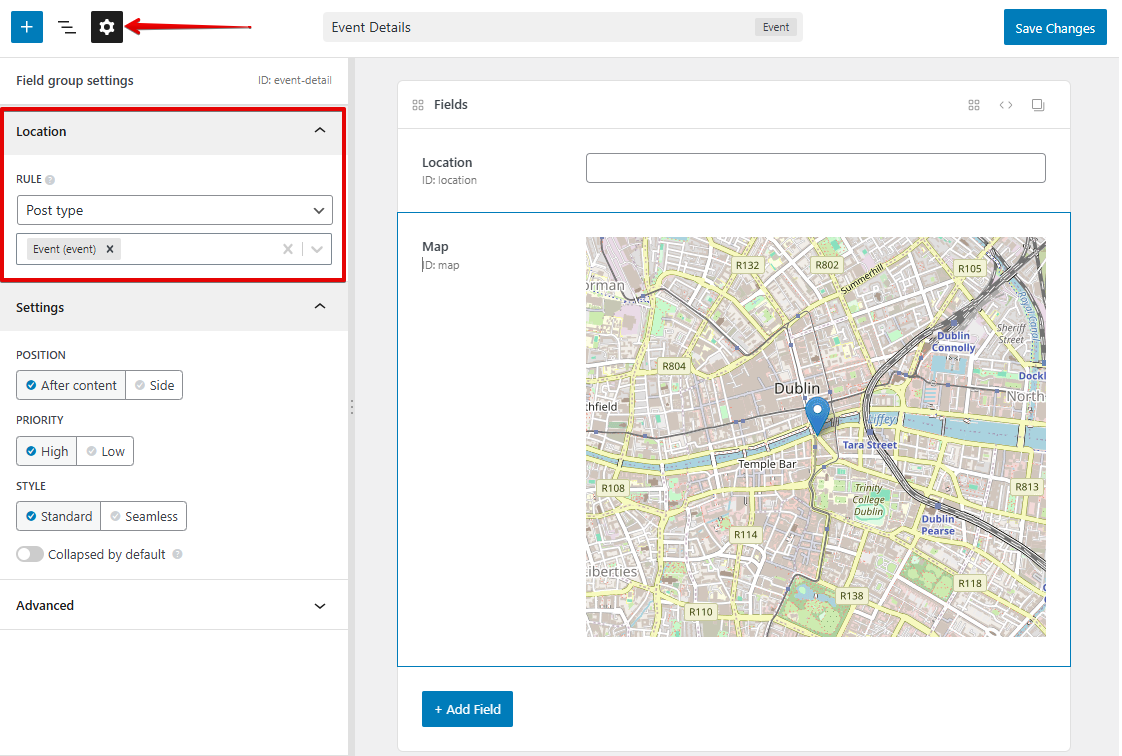
After that click the Save Changes button to finish.
Now go to your post type and add a new post, you'll see the field group with custom fields displayed below the editor where you can enter the data you want:

In the case that you don't want to use Meta Box Lite, you have two ways to have MB Builder:
- Get MB Builder individually. In this case, the Meta Box plugin is required to be installed.
- Purchase a premium plan to use Meta Box AIO that includes all extensions, including MB Builder.
The technical term of field groups in WordPress is "meta box". You'll see them via WordPress functions like add_meta_box or remove_meta_box. That's why we name our brand Meta Box!
You can also create custom fields with code, which is suitable if you want to keep everything in your themes or plugins.
Displaying fields
After having all the data for custom fields, it's time to show them on the front end.
We'll display the event details for the event post type that we created in the previous steps for example. This is the single event page on the front end, and we'll display the event details below the event description:

To do that, we'll use the MB Views extension, which offers a powerful and flexible way to select and display fields.
MB Views is a premium extension and is available for premium licenses only. If you don't own the right license, please purchase one.
To begin, we need to create a "view". A "view" is a template where we show our fields. To create a view, go to Meta Box » Views and click Add New button.
On the edit view screen, enter the view title. To insert a field to the template, click the Insert Field button, which opens a panel with all the available fields:

You'll see other WordPress fields as well such as post title or post content. For the custom fields we created, just choose one and click on its name on the list.

For some kinds of data, Meta Box may offer some options for the output. It will show a popup asking for the output format as follows:

Choose an output format from the dropdown and click the Insert button to insert the field to the template. After that, you'll see the template now has the following text:
{{ post.datetime | date( 'F j, Y' ) }}

That's the value of the field which will be displayed on the front end. However, displaying only text might be confusing, so we'll a label for it by adding the <strong>Date and time:</strong> before the text and wrap it in a paragraph (between <p> and </p> tags) to add some space. The template now looks like:
<p>
	<strong>Date and time:</strong> {{ post.datetime | date( 'F j, Y' ) }}
</p>
You can use any HTML tags and/or WordPress shortcodes in the view template.
Now repeat the process for other fields: location and map. For map, as it's displayed as a Open Street Maps, we'll need change the HTML a little bit to put it below the label:

Now you need to set up the view to display below the post content of the event page in the Settings box as follows:

Finally, click the Publish button to finish.
Now go to the event page on the front end and you'll see the custom fields that we created:

If you use a page builder to display the data, you can refer to the tutorials for usage in real cases.
You can also display custom fields with code, which is suitable if you want to keep everything in your themes or plugins.
Next steps
Now you know all the basics for working with custom fields in Meta Box. Depending on your needs, I'd suggest you take a look at:
- Advanced topics, or
- Explore the field type gallery to know which fields are suitable for your needs, or
- Explore more features provided by extensions
If you have any questions, feel free to ask in the support forum or discuss in the Facebook community group.
Thanks for using Meta Box and happy building websites!