MB Custom Table
MB Custom Table helps you to save custom fields' values to a custom table instead of the default WordPress meta table. All custom fields for a post are saved in a single row, where each column contains the value of a corresponding field.
This reduces the number of rows in the database which can help improve the performance when the data grows and lets you have all of your data in one place, so you can easily view, edit, import, and export it.

Getting started
The easiest way to work with custom tables is using MB Builder. It provides a UI to create custom tables and automatically save custom fields to table columns.
When creating a field group with MB Builder, click on the settings button on the left sidebar and you'll see options to use a custom table as follows:
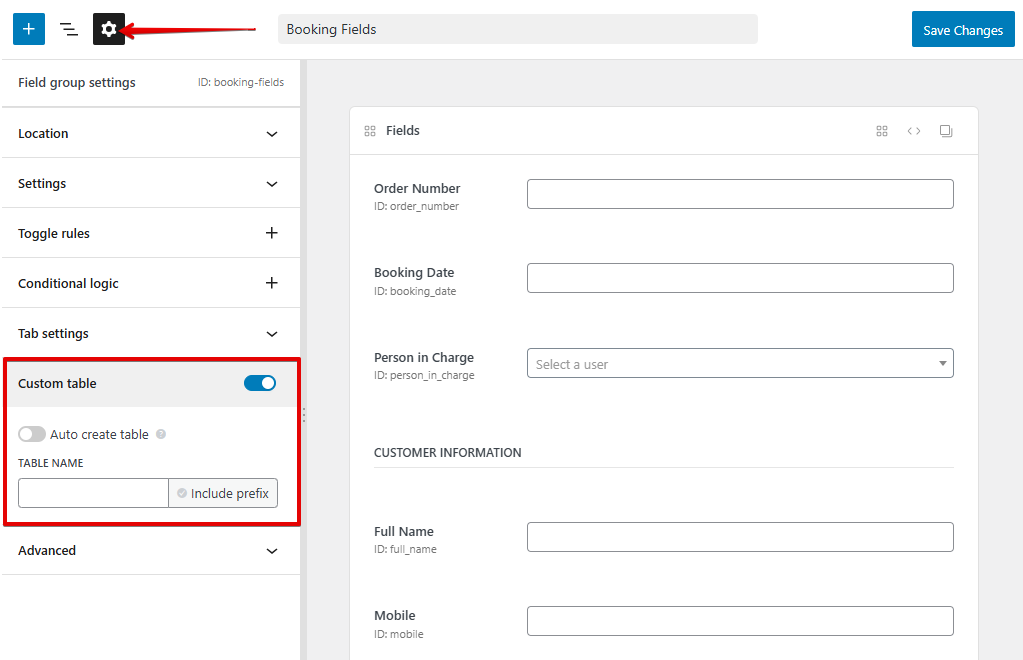
Turn on the option to Custom table, and enter the Table name. By default, the table name doesn't contain the WordPress table prefix. If you want to use the WordPress table prefix, enable the Include table prefix option (and don't enter the prefix manually).
If you select the option Auto create table, the plugin will attempt to create the table for you. Once it's done, you'll see the custom table in your database, which has columns that match your custom field IDs, each column per field ID. To make the data compatible with the field data, the plugin uses the data type TEXT for all columns.
Now you can go to the edit post screen (or the edit user profile if you use the meta box for users) and save the post. You'll see the data is saved in the new custom table instead of the post meta table.
The plugin will map custom table columns with custom field IDs, one column per custom field. If you have a group field, then the column name will be the top-level group ID, and it won't create columns for sub-fields. When you save a post, each custom field is stored in a corresponding column.
Using custom tables with code
Using custom tables with code is suitable if you want to have more control over the data type or index key which can help improve the performance. It's recommended when you're a developer and you're familiar with MySQL.
Creating a custom table
Use the plugin API to create a custom table as follows:
add_action( 'init', function () {
	MetaBox\CustomTable\API::create(
		'my_custom_table',                // Custom table name.
		[                                 // List of columns with data types.
			'address' => 'TEXT NOT NULL',
			'phone'   => 'TEXT NOT NULL',
			'email'   => 'VARCHAR(20) NOT NULL',
		],
		[ 'email' ],                      // List of columns that will be indexed.
	);
} );
Here we use the init hook to make sure the API is ready to use. The code will generate an SQL query for creating a custom table like this:
$sql = 'CREATE TABLE my_custom_table (
  ID int(11) unsigned NOT NULL,
  address TEXT NOT NULL,
  phone TEXT NOT NULL,
  email VARCHAR(20) NOT NULL
  PRIMARY KEY  (ID)
  KEY email
)';
| Parameter | Description |
|---|---|
table_name | The custom table name. Required. |
columns | Array of table columns, where the key is the column name and the value is the MySQL data type. Required. |
keys | Array of key column names, which will be indexed. Optional. Note that if you want to index BLOB and TEXT columns, make sure you set a fixed length for them. |
Notes
A. Use only alphanumeric and underscore characters for the table name. Do not use any special characters, dashes, or spaces.
B. The table name doesn't need to include the WordPress table prefix. The extension does not put any constraints on you to define the table name. If you want to include the WordPress table prefix, do this:
global $wpdb;
MetaBox\CustomTable\API::create( "{$wpdb->prefix}my_custom_table", [
	'address' => 'TEXT NOT NULL',
	'phone'   => 'TEXT NOT NULL',
	'email'   => 'VARCHAR(20) NOT NULL',
] );
C. Do not add ID column. The ID column is automatically created and set as the primary key in the table. It's used to store the object ID for future reference. Object ID can be the post ID, user ID, or term ID depending on what meta type the table is used for.
D. The column names must match custom field IDs, one column per custom field. If you create a column to store a group, then the column name must be the top-level group ID. Don't create columns for sub-fields.
E. The extension uses WordPress's recommended method to create a custom table, which means if the table already exists, the code will do nothing. Although, it's recommended to run the code that creates custom tables only when activating your plugin, like this:
register_activation_hook( __FILE__, function() {
	MetaBox\CustomTable\API::create( 'my_custom_table', [
		'address' => 'TEXT NOT NULL',
		'phone'   => 'TEXT NOT NULL',
		'email'   => 'VARCHAR(20) NOT NULL',
	], [ 'email' ] );
} )
But if you can't run the code when activating your plugin, it's fine to run the code with the init or plugins_loaded hook.
Using existing tables
You can also use an existing table to store your data. The table can be manually created by a plugin, a theme, or any tool like phpMyAdmin. To use it with Meta Box:
- The custom table must have the ID column. It's required to connect entries in the custom table with WordPress posts, terms, or users table.
- The columns in the custom table much match the field IDs in your meta box.
Connecting custom fields to a custom table
To tell a field group to use a custom table to store custom fields, you need to specify 2 parameters storage_type and table like this:
add_filter( 'rwmb_meta_boxes', function( $meta_boxes ) {
	$meta_boxes[] = [
		'title'        => 'Meta Box Title',
		'storage_type' => 'custom_table',
		'table'        => 'my_custom_table', // Your custom table name
		'fields'       => [
			[
				'id'   => 'address',
				'name' => 'Address',
			],
			[
				'id'   => 'phone',
				'name' => 'Phone',
			],
			[
				'id'   => 'email',
				'type' => 'email',
				'name' => 'Email',
			],
		],
	];
	return $meta_boxes;
} );
Again, column names have to match your custom fields' IDs, one column per custom field. If you create a column to store a group, then the column names must be the top-level group ID. No need to create columns for sub-fields.
Now you can go to the edit post screen (or the edit user profile if you use the meta box for users) and save the post. You'll see the data is saved in the new custom table instead of the post meta table.
Video tutorial
Getting field value
Use the helper rwmb_meta() function to get a field value. The only difference is you need to specify the table name in the 2nd argument:
$args = [
	'storage_type' => 'custom_table',
	'table'        => $table_name,
];
$value = rwmb_meta( $field_id, $args, $post_id );
echo $value;
Also, note that the call to the custom table will be cached, e.g. if you call the helper function several times for the same $post_id, it will only query once. This technique will improve the database performance.
You can also use the [rwmb_meta] shortcode to display a field value. You need to set the shortcode attributes similar to the rwmb_meta() helper function:
[rwmb_meta id="field_id" storage_type="custom_table" table="table_name"]
Group fields
For group fields, it's worth mentioning that the whole group value, including sub-field values, is saved as a serialized array in one column. So, they're not as flat as other fields.
That means:
- When you create a table, please create only one column for the group (even if that group contains many sub-fields or sub-groups). The column name must be the group ID.
- The group value is serialized, you cannot make SQL queries against the sub-fields values. Thus, you don't benefit from the custom table structure. So, be careful to decide on what fields should be in groups and what fields should not. It's recommended to use groups only for data storing, not for querying.
While the data of the group is serialized, it will be unserialized when getting via helper functions. So you don't have to unserialize yourself.
Query posts with WP_Query
It's important to understand that the plugin doesn't hook to the WP_Query to get posts by custom fields stored in the custom table. In other words, using meta_* in WP_Query for custom fields won't work.
To get posts by custom fields in the custom table, you need to make an extra query to get the post IDs first. Then use these IDs to get full post objects.
Here is an example:
global $wpdb;
$ids = $wpdb->get_col( "SELECT ID FROM your_table WHERE field1 = 'value1' OR field2 = 'value2'" );

if ( empty( $ids ) ) {
	echo 'There are no posts';
} else {
	$query = new WP_Query( [
		'post_type' => 'post',
		'post__in'  => $ids,
	] );
	// Do something
}
This technique also works with terms and users.
Custom models
Besides custom tables for built-in WordPress posts, terms, and users, the plugin allows you to create custom models, that mimic the WordPress posts, but store the data completely in custom tables. So you don't need to connect to posts, terms, or users anymore. The data is stored only in one table, which is more efficient.
Pros:
- Better data structure, because you can define the custom table to match your needs.
- Don't mess with WordPress tables. You manage data on your own.
- Complete CRUD for models so you can create/edit/delete them quickly.
- Compatible with all Meta Box field types.
- Use the similar Meta Box and WordPress API/UI to show a list of models or edit models.
- Compatible with MB Admin Columns extension to show fields in admin columns.
Cons:
- Models don't have front-end templates like posts. You won't have permalinks for each model and their archive. Models should be used for managing data. If you want to have the power of the templates, then you should use the normal custom tables above.
- Limited compatibility with some extensions such as MB Relationships and MB Views.
Usage
To create and use custom models, you need to follow 3 steps below:
Step 1: Register a model
Registering a model is very similar to a custom post type in WordPress, with fewer parameters. The code below registers a custom model transaction.
// Step 1: Register a model.
add_action( 'init', function() {
	mb_register_model( 'transaction', [
		'table'  => 'transactions',
		'labels' => [
			'name'          => 'Transactions',
			'singular_name' => 'Transaction',
		],
		'menu_icon' => 'dashicons-money-alt',
		'supports' => [ 'author', 'published_date', 'modified_date' ],
	] );
} );
| Parameter | Description |
|---|---|
table | Custom table for the model. Required. |
labels | An array of labels for this model. Required. See below for the list of labels. |
show_in_menu | Where to show the menu in the admin menu. Optional. Default true. |
menu_position | The position in the menu where the model should appear. Optional. Default null (at the bottom). |
menu_icon | The URL to the icon to be used for this menu. Pass a base64-encoded SVG using a data URI, which will be colored to match the color scheme -- this should begin with 'data:image/svg+xml;base64,'. Pass the name of a Dashicons helper class to use a font icon, e.g. 'dashicons-chart-pie'. Pass 'none' to leave div.wp-menu-image empty so an icon can be added via CSS. Defaults to use the posts icon. |
parent | Menu parent, if you want to show the model as a sub-menu. Optional. |
capability | The capability to access the menu and create/edit/delete models. Default edit_posts. |
supports | Feature(s) the model supports. Array. Optional. Can be any of author, published_date, modified_date. |
List of labels:
| Name | Description |
|---|---|
name | General name for the model, usually plural. |
menu_name | Label for the menu name. The default is the same as the name. |
singular_name | Name for one item of this model. |
add_new | Label for 'Add New' models. |
add_new_item | Label for adding a new singular item. |
edit_item | Label for editing a singular item. |
search_items | Label for searching plural items. |
not_found | Label used when no items are found. |
all_items | Label to signify all items in the page title. |
item_updated | Label used when an item is updated. |
item_added | Label used when an item is added. |
item_deleted | Label used when an item is deleted. |
Supports:
Sometimes, you may want your model to automatically include metadata such as the author, published date, or modified date - without having to manually set them each time.
To do this, you can use the supports parameter when defining your model. This parameter is optional and accepts an array of supported features:
author- Automatically assigns the current user as the author.published_date- Automatically sets the date when the model is created.modified_date- Automatically updates the date when the model is modified.
For example:
'supports' => [ 'author', 'published_date', 'modified_date' ],
By adding these options, your model will automatically handle common metadata fields, making your workflow simpler and more consistent.
Step 2: Create a custom table for the model
Creating a custom table is exactly the same to the section above. However, for models, the plugin automatically:
- Adds an
IDcolumn, and sets it as primary key and auto-increment. - Adds columns for supports (
author,published_date,modified_date) if needed. - Adds a key for
authorif the model supports it.
Step 3: Register fields for the model, corresponding to the custom table structure
Registering fields for models is the same as for posts. You just need to specify which model the meta box is for.
If your custom table has many fields, you can split them into multiple meta boxes, to enter the data more conveniently. The order of fields doesn't matter when saving.
// Step 3: Register fields for the model, corresponding to the custom table structure.
add_filter( 'rwmb_meta_boxes', function ( $meta_boxes ) {
	$meta_boxes[] = [
		'title'        => 'Transaction Details',
		'models'       => ['transaction'], // Model name
		'storage_type' => 'custom_table',  // Must be 'custom_table'
		'table'        => 'transactions',  // Custom table name
		'fields'       => [
			[
				'id'          => 'created_at',
				'type'        => 'datetime',
				'name'        => 'Created at',
				'js_options'  => [
					'timeFormat' => 'HH:mm:ss',
				],
				'admin_columns' => true,
			],
			[
				'id'     => 'amount',
				'type'   => 'number',
				'name'   => 'Amount',
				'append' => 'USD',
				'admin_columns' => [
					'position' => 'after id',
					'sort'     => true,
				],
			],
			[
				'id'   => 'gateway',
				'name' => 'Gateway',
				'admin_columns' => true,
			],
			[
				'id'   => 'status',
				'type' => 'select',
				'name' => 'Status',
				'options' => [
					'pending'   => 'Pending',
					'completed' => 'Completed',
					'refunded'  => 'Refunded',
				],
				'admin_columns' => true,
			],
		],
	];

	$meta_boxes[] = [
		'title'        => 'Additional Transaction Details',
		'models'       => ['transaction'], // Model name
		'storage_type' => 'custom_table',  // Must be 'custom_table'
		'table'        => 'transactions',  // Custom table name
		'fields'       => [
			[
				'id'   => 'email',
				'type' => 'email',
				'name' => 'Email',
				'admin_columns' => [
					'position'   => 'after amount',
					'searchable' => true,
				],
			],
			[
				'id'            => 'screenshot',
				'type'          => 'image_advanced',
				'name'          => 'Screenshots',
				'admin_columns' => true,
			],
		],
	];

	return $meta_boxes;
} );
After completing 3 steps, you'll see the Transactions menu on the left and you can add/edit/delete models easily as follows:
Getting field values for models
To get a field value for models, you can use 2 methods:
Using custom table API to get the raw value in the custom table.
$value = \MetaBox\CustomTable\API::get_value( $field_id, $model_id, $table_name );

// Example: returns 'completed'
$status = \MetaBox\CustomTable\API::get_value( 'status', 3, 'transactions' );
Using the helper function to get the formatted value:
$value = rwmb_meta( $field_id, [
	'object_type' => 'model', // Must be 'model',
	'type'        => $model,
], $model_id );

// Example: returns 'Completed'
$status = rwmb_meta( 'status', [
	'object_type' => 'model',
	'type'        => 'transaction',
], 3 );
Bulk actions
Add a custom bulk action
The plugin provides a way to handle bulk actions for custom models. By default, it supports only the delete action.
To add more custom bulk actions, use the mbct_{$model}_bulk_actions filter, which filter accepts an array with the key as the action name and value as the action label.
add_filter( 'mbct_transaction_bulk_actions', function ( $actions ) {
	$actions['refund-all'] = 'Refund';
	return $actions;
} );
Create bulk action handlers
To hanle a bulk action, create a function named mbct_{$action}_bulk_action. The action name is auto-converted to lowercase and uses underscores instead of hyphens. In the example above, the function name is mbct_refund_all_bulk_action.
The function can accept up to 3 parameters: $ids, $model, and $request regardless of the number of parameters and order, e.g. ( $ids, $model ), ( $model, $ids ), ( $request, $ids, $model )... are valid function signatures.
| Parameter | Type | Description |
|---|---|---|
$ids | int[] | An array of object IDs |
$model | MetaBox\CustomTable\Model | The model object. You can use this object to get the model name, table name, and other information. |
$request | RWMB_Request | The request object which contains the request data. In every request, we have action, bulk_action, ids, model, and _ajax_nonce fields. You can get the value of a field by calling $request->post( $field_name ). |
function mbct_refund_all_bulk_action( $ids, $model ) {
	foreach ( $ids as $id ) {
		\MetaBox\CustomTable\API::update( $id, $model->table, [
			'status' => 'refunded',
		] );
	}
	wp_send_json_success();
}
Alternatively, you can hook to mbct_{$action}_bulk_action to handle the bulk action, which accepts the same parameters as the callback function.
add_action( "mbct_{$action}_bulk_action", my_function( $ids, $model, $request ) {
	foreach ( $ids as $id ) {
		\MetaBox\CustomTable\API::update( $id, $model->table, [
			'status' => 'refunded',
		] );
	}
	wp_send_json_success();
}, 10, 3 );
Redirection and custom message
By default, the page will get reloaded after the bulk action is completed. You can set the redirect URL by passing an array with the redirect key in the wp_send_json_success() function in your callback function.
// in your callback function
wp_send_json_success( [
	'redirect' => add_query_arg( 'model-message', 'updated', admin_url( 'admin.php?page=model-transaction' ) ),
] );
The above code will redirect the user to the admin.php?page=model-transaction&model-message=updated.
Since the plugin supports custom messages via the model-message query string and matches it with labels in the custom model.
You can set the custom message by adding the item_updated label in the labels parameter of the model registration.
// In your model registration
mb_register_model( 'transaction', [
	/// ...
	'labels' => [
		'name'          => 'Transactions',
		'singular_name' => 'Transaction',
		'item_updated'  => 'Transaction updated.',
	],
	//...
] );
As the above example. The Transaction updated message will be shown to the user after the bulk action is completed.
Custom error message
You can also set a custom error message by calling wp_send_json_error( $message ) in your callback function, in which $message is an error string.
For example:
// In your callback function
if ( ! current_user_can( 'manage_options' ) ) {
	wp_send_json_error( 'Sorry, you are not allowed to do this action.' );
}
The error message will be shown as a browser alert box to the user.
Hooks
mbct_{$model}_query_where
Filters the where statement in the query in the custom model table list. Accepts one parameter - the where statement. It should include the term WHERE if not empty.
add_filter( 'mbct_transaction_query_where', function( $where ) {
	return $where ? $where . ' AND status="completed"' : 'WHERE status="completed"';
} );
mbct_{$model}_query_order
Filters the order statement in the query in the custom model table list. Accepts one parameter - the order statement. It should include the ORDER BY term if not empty.
add_filter( 'mbct_transaction_query_order', function( $order ) {
	return $order ? $order : 'ORDER BY created_at DESC';
} );
mbct_{$model}_prepare_items
Filters the SQL query in the custom model table list to get items. Accepts one parameter - the SQL.
This filter is useful when you want to join the current model table with other tables to filter the results.
add_filter( 'mbct_transaction_prepare_items', function( $sql ) {
	$sql = str_replace(
		'SELECT * FROM wp_transactions',
		'SELECT t.*, c.ID FROM wp_transactions t JOIN wp_customers c ON t.ID = c.transaction_id'
		$sql
	);
	return $sql;
} );
mbct_{$model}_total_items
Filters the SQL query in the custom model table list to get total items. Accepts 2 parameters:
$sql: the full SQL query,$where: theWHEREstatement in the query.
add_filter( 'mbct_transaction_total_items', function( $sql, $where ) {
	$sql = "SELECT COUNT(t.*) FROM wp_transactions t JOIN wp_customers c ON t.ID = c.transaction_id $where";
	return $sql;
}, 10, 2 );
mbct_{$model}_columns
Filters the list of columns in the custom model table list. Accepts one parameter - the array of columns.
mbct_{$model}_sortable_columns
Filters the list of sortable columns in the custom model table list. Accepts one parameter - the array of sortable columns.
mbct_{$model}_column_output
Filters the output of a column in the custom model table list. Accepts 4 parameters:
$output: the output$column_name: the column name$item: the array of the item data$model: the model name
mbct_{$model}_row_actions
Filters the list of actions for each row item in the custom model table list (default is Edit and Delete). Accepts one parameter - an associate array of actions.
mbct_{$model}_bulk_actions
Filters the list of bulk actions for each row item in the custom model table list (default is Delete). Accepts one parameter - an associate array of actions.
mbct_{$action}_bulk_action
Fires when a bulk action is performed, used to handle the bulk action. Accepts 3 parameters:
| Parameter | Type | Description |
|---|---|---|
$ids | int[] | An array of object IDs |
$model | MetaBox\CustomTable\Model | The model object. You can use this object to get the model name, table name, and other information. |
$request | RWMB_Request | The request object which contains the request data. In every request, we have action, bulk_action, ids, model, and _ajax_nonce fields. You can get the value of a field by calling $request->post( $field_name ). |
See bulk actions for details.
mbct_restrict_manage_posts
Fires after the bulk action for the custom model table list. It's usually used to output custom filters for the table. Accepts 2 parameters:
$model: the model name$which:toporbottom- the position of the filters
mbct_manage_posts_extra_tablenav
Fires after the bulk action and after mbct_restrict_manage_posts. Accepts one parameter - $which which can be top or bottom - the position in the table.
mbct_submit_box
Filters the output of the submit meta box. Accepts 2 parameters:
$output: the HTML output$model: the model name
mbct_before_submit_box
Fires before the output of the submit meta box. Accepts one parameter - the model name.
mbct_after_submit_box
Fires after the output of the submit meta box. Accepts one parameter - the model name.
mbct_before_add
mbct_after_add
mbct_before_update
mbct_after_update
These are actions that fire before/after adding/updating data in a custom table. Accepts 3 parameters:
$object_id: the object ID$table: the table name$row: the associate array of data
mbct_before_delete
mbct_after_delete
These are actions that fire before/after deleting data in a custom table. Accepts 2 parameters:
$object_id: the object ID$table: the table name
mbct_add_data
mbct_update_data
These are filters that let you change the data before inserting/updating into the custom table. Accepts 3 parameters:
$row: the associate array of data$object_id: the object ID$table: the table name
These filters should return an array of data (e.g., the $row).
Notes
Each model can have only one custom table.
While models work with all Meta Box field types, the data of cloneable/multiple/group fields is always an array, thus it's saved as a serialized array in the model table column.
API
The plugin has the following APIs for you to work with the data in custom tables. These APIs work well with both custom tables for posts/terms/users and models.
exists
Check if a custom table has a row for an object. In other words, check if an object has data stored in a custom table.
$exists = \MetaBox\CustomTable\API::exists( $object_id, $table );

if ( $exists ) {
	// Do something.
}
get
Get all custom fields data for an object from a custom table. The returned data is an array, where keys are custom field IDs, and values are custom field values.
The data is raw, meaning it's not formatted yet. For example: for images, you'll get the attachment IDs instead of an array of URL, width, height, size, etc. as you get via rwmb_the_value function.
Parameters:
$object_id (int) (required) The object (row) ID.
$table (string) (required) The custom table name.
$force (bool) (optional) Whether to force to get the data from the database, not from the cache. Default is true.
$data = \MetaBox\CustomTable\API::get( $object_id, $table, $force );

// Inspect the data.
print_r( $data );

/*
Result:
[
	'field_1' => 'value 1',
	'field_2' => 'value 2',
	'field 3' => ['one', 'two', 'three'],
]
*/
add
Add an array of custom field values for an object. Make sure the data for the object doesn't exist yet in the database.
$data = [
	'field_1' => 'value 1',
	'field_2' => 'value 2',
	'field 3' => ['one', 'two', 'three'],
];
\MetaBox\CustomTable\API::add( $object_id, $table, $data );
In case you want to add a row for a custom model, set $object_id to null.
Technically, this method calls the wpdb::insert method, which returns the number of rows inserted (which is always 1) or false on error.
If you want to get the ID of the inserted row, please use this code:
global $wpdb;
$id = $wpdb->insert_id;
If there's an error (like the data format is not compatible with the table column format), you can get the error message like this:
print_r( $wpdb->last_error );

// Output:
// WordPress database error: Processing the value for the following field failed: status. The supplied value may be too long or contain invalid data.
update
Update the data for an object. Works similarly to add. Make sure the data for the object exists in the database.
$data = [
	'field_1' => 'value 1',
	'field_2' => 'value 2',
	'field 3' => ['one', 'two', 'three'],
];
\MetaBox\CustomTable\API::update( $object_id, $table, $data );
delete
Delete all data for an object in the custom table.
\MetaBox\CustomTable\API::delete( $object_id, $table );