MB Frontend Submission
MB Frontend Submission helps you create front-end forms for users to submit data to your website. It allows you to submit data for posts like post fields (title, content, etc.) and also custom fields created by Meta Box. It also support to custom table models and works with all extensions like MB Group or MB Conditional Logic.

Submission form
Adding the submission form
To add a submission form to a page, select the Submission Form block from the block inserter. And you'll see the form preview like this:

Clicking on the block will reveal the form settings on the right. All settings are self-explained and have their description.
The plugin also provides a shortcode to insert the submission form into a page:
[mb_frontend_form id="field-group-id" post_fields="title,content"]
You can also submit data to a MB Custom Table model:
[mb_frontend_form id="field-group-id" object_type="model"]
If you're using MB Builder, go to Meta Box > Custom Fields admin page and copy the content in the Shortcode column for the field group that you created:

Below is the list of the settings. The attribute is used for the shortcode.
| Name | Attribute | Description |
|---|---|---|
| ID | id | Field group ID(s). If multiple field groups, enter their IDs separated by commas. Optional. |
| Ajax | ajax | Enable Ajax submission. true or false (default). |
| Allow scroll | allow_scroll | Enable scroll to message after ajax submission. false or true (default). |
| Edit | edit | Allow users to edit the post after submitting. true or false (default). If true then ajax submission will be disabled. |
| Allow delete | allow_delete | Allow users to delete the submitted post. true or false (default). |
| Force delete | force_delete | Whether to delete the submitted post permanently or temporarily (move to Trash). |
| Show add more | show_add_more | Show add new button after submit. true or false (default). |
| Object type | object_type | The object type for the submitted data. Can be either post or model. Default is post. |
| Object ID | object_id | Optional. Used when you want to update an existing object. If you want to pass the ID of the current post, set it to current. |
| Post type | post_type | The submitted post type. Optional. Default is the first post type defined in the meta box. If the meta box is made for multiple post types, you should set this attribute to the correct one. |
| Post ID (deprecated) | post_id | The post ID. Optional. Used when you want to update an existing post. If you want to pass the ID of the current post, set it to current. This attribute is deprecated, use object_id instead. |
| Post status | post_status | The status for submitted posts. See the list here. |
| Post fields | post_fields | List of post fields you want to show in the frontend, separated by commas. Supported the following fields: title, content, excerpt, date, and thumbnail. |
| Title field label | label_title | Label for the post title field. |
| Content field label | label_content | Label for the post content field. |
| Excerpt field label | label_excerpt | Label for the post excerpt field. |
| Date field label | label_date | Label for the post date field. |
| Thumbnail field label | label_thumbnail | Label for the post thumbnail field. |
| Submit button text | submit_button | The submit button text. |
| Add new button text | add_button | The add new button text. |
| Delete button text | delete_button | The delete button text. |
| Custom redirect URL | redirect | Custom redirect URL. |
| Confirmation text | confirmation | The text for the confirmation message when the form is successfully submitted. |
| Delete confirmation text | delete_confirmation | The text for the confirmation message when the post is deleted. |
| reCaptcha key | recaptcha_key | Google reCaptcha site key (version 3). Optional. |
| reCaptcha secret | recaptcha_secret | Google reCaptcha secret key (version 3). Optional. |
Hiding a field
When you set the form to display fields from a field group, all fields are displayed by default. If you want to hide a field from front-end forms, then you need to set a settings for it.
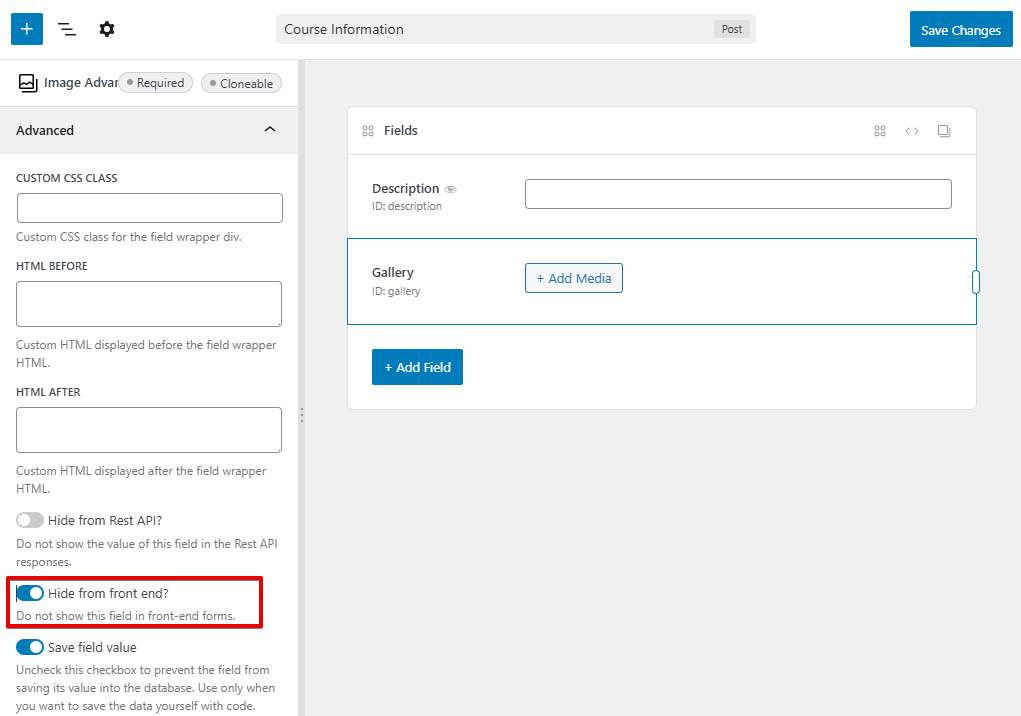
If you use MB Builder to build the field group, please enable the settings Hide from front end from the field's Advanced settings menu:
If you use code to register fields, please set the field as follows:
[
    'id'              => 'gallery',
    'name'            => 'Gallery',
    'type'            => 'image_advanced',
    'hide_from_front' => true,
]
Dynamic population
The dynamic population feature allows you to dynamically populate a shortcode attribute with a value. This value can be passed via the query string and/or hook.
Query string
You can populate the post ID for the shortcode via the query string by appending the dynamic population parameter for the attribute to the end of your form URL along with your custom value.
https://example.com/form-url/?rwmb_frontend_field_object_id=123
The query parameter is rwmb_frontend_field_object_id.
Note that only object ID is supported for populating via query string since version 2.2.0.
Hooks
Shortcode attributes can also be populated via WordPress hooks. This example below changes the post_id to 123:
add_filter( 'rwmb_frontend_field_value_post_id', 'my_custom_population_function', 10, 2 );
function my_custom_population_function( $value, $args ) {
    if ( $args['id'] === 'your_meta_box_id' ) { // Only filter for a specific form.
        $value = 123;
    }
    return $value;
}
This snippet would be pasted in your theme's functions.php file or your plugin's PHP file.
The filter has the following format:
$value = apply_filters( "rwmb_frontend_field_value_{$attribute}", $value, $args );
The callback function accepts 2 parameters: the attribute value and the array of all attributes. You should use $args['id] to check if you're filtering for the right form.
Templates
The plugin allows you to use custom template files for post fields and the confirmation message.
The plugin will look for a template file in the following order:
- Inside a folder
mb-frontend-submissionof your child theme - Inside a folder
mb-frontend-submissionof your parent theme - In the plugin's
templatesfolder
To overwrite the output of post fields, please follow the steps below:
- Create a folder
mb-frontend-submissionin your theme. - Copy a template file that you want to change from the plugin's
templatesfolder to the newmb-frontend-submissionfolder, keeping the same folder structure. - Modify the new template file.
Field order
Sometimes you want to mix post fields with custom fields or change post content to a textarea field. You can do that with the following steps:
- Remove the
post_fieldsattribute from the shortcode - Add post fields as normal custom fields to your meta box settings, like this:
$meta_boxes[] = [
    'title'  => 'Bill Submit',
    'id'     => 'bill',
    'fields' => [
        [
            'name' => 'Submission Date',
            'id'   => 'submission_date',
            'type' => 'date',
        ],
        [
            'name' => 'Title',
            'id'   => 'post_title',
        ],
        [
            'name'    => 'Type',
            'id'      => 'type',
            'type'    => 'select',
            'options' => [
                'docs'    => 'Document',
                'receipt' => 'Receipt',
            ],
        ],
        [
            'name' => 'Description',
            'type' => 'textarea',
            'id'   => 'post_content',
        ],
        [
            'name' => 'Thumbnail',
            'type' => 'single_image',
            'id'   => '_thumbnail_id',
        ],
    ],
]
To make the plugin recognize the post fields, you need to set correct IDs for them as follows:
| Field | ID |
|---|---|
| Post title | post_title |
| Post content | post_content |
| Post excerpt | post_excerpt |
| Post date | post_date |
| Post thumbnail | _thumbnail_id |
With this method, you're able to set the label for post fields or change settings (even field type) for them easily using any field settings.
Validation
There are 2 ways to validate fields: on the front end with JavaScript and on the back end with PHP.
For front-end validation with JavaScript, please see this documentation.
To validate on the back end with PHP, please use the rwmb_frontend_validate filter as follows:
add_filter( 'rwmb_frontend_validate', function( $validate, $config ) {
    // Check only if you're on the right form.
    if ( 'your-meta-box-id' !== $config['id'] ) {
        return $validate;
    }
    // Check if users have selected files for an image upload field.
    if ( empty( $_POST['image_upload_field'] ) ) {
        $validate = false; // Return false to show an error message.
    }
    return $validate;
}, 10, 2 );
If you want to show a custom error message, return a string for the filter, like this:
add_filter( 'rwmb_frontend_validate', function( $validate, $config ) {
    if ( 'your-meta-box-id' !== $config['id'] ) {
        return $validate;
    }
    if ( empty( $_POST['image_upload_field'] ) ) {
        $validate = 'Please select at least one image to upload'; // Return a custom error message
    }
    return $validate;
}, 10, 2 );
File upload
User capability
To be able to upload files or images with the media popup (via fields file_advanced, file_upload, image_advanced, image_upload), users have to log in and proper capability upload_files to access the Media Library. If your users don't have that capability (like if they have the "subscriber" role), then the upload fields don't work. In that case, you can add the capability for that role as follows:
add_action( 'init', function () {
    $subscriber = get_role( 'subscriber' );
    $subscriber->add_cap( 'upload_files' );
} );
Another solution is using file or image fields. Both of them work similarly. They just don't have a nice UI, but they do the job very well.
Post thumbnail
Another improvement you might want to add is to use the media popup to pick an image as the post thumbnail. By default, it uses the image field, which provides a simple input for an image.
To do that, you need to change the field type for the thumbnail from image to single_image. Here are the steps:
- Create a folder
mb-frontend-submissionin your theme, inside that folder, create a sub-folderpost. - Copy the file
thumbnail.phpfrom the plugin'stemplates/postfolder to thepostfolder above. - Replace the content of the copied
thumbnail.phpwith this code.
Please note that to open the media popup, users need to log in and have the proper capability. See the section above for how to do that.
Embedding forms
If you have a front-end submission form on site A, then you want to output it on site B by embedding the form within an iframe, there might be a problem with the cookie policy on browsers that prevent it from submitting.
To make it work please add this snippet to functions.php in your theme on site A:
add_action( 'template_redirect', function () {
    if ( session_status() !== PHP_SESSION_NONE || headers_sent() ) {
        return;
    }

    $params = session_get_cookie_params();
    session_set_cookie_params( $params['lifetime'], '/; samesite=None', $_SERVER['HTTP_HOST'], true, false );
    session_start();
}, 9 );
The snippet above will set the cookie setting samesite=None and Security=true. Note that you can only use it on sites that use HTTPS (connection security) and on Chrome and Firefox. It doesn't work on Safari because Safari is blocking third-party cookies. Setting samesite=None also might be a security issue, so please be sure you want to do that. For more details, please see this article.
User dashboard
Similar to the submission form, MB Frontend Submission provides a Gutenberg block for you to insert into a page. The block let users view and edit their submitted posts.
To insert a block, select the User dashboard block from the block inserter:

If you prefer to use shortcodes, use the following shortcode:
[mb_frontend_dashboard edit_page="124"]
Below is the list of the settings. The attribute is used for the shortcode.
| Name | Attribute | Description |
|---|---|---|
| Edit page | edit_page | The ID of the page, where users can submit posts. |
| Field group ID(s) | id | Overwrite field group ID(s) from the edit page. If multiple field groups, enter their IDs separated by commas. |
| Object type | object_type | The object type for the submitted data. Can be either post or model. Default is post. |
| Model name | model_name | The model name for the submitted data. Required if object_type is model. |
| Post type | post_type | Overwrite the submitted post type from the edit page. |
| Show welcome message | show_welcome_message | Show the welcome message true (default) or false. |
| Columns | columns | List of columns to be displayed in the dashboard, separated by commas. For example: title, date, and status... |
| Title column label | label_title | The label for the title column. |
| Date column label | label_date | The label for the date column. |
| Status column label | label_status | The label for the status column. |
| Actions column label | label_actions | The label for the actions column. |
| Post Action Link | title_link | The link action when clicking post titles: edit or view (default). |
| Add new button text | add_new | The add new button text. |
You must create a page for submitting posts first, then use its ID in the edit_page attribute.
When users visit this page, they'll see a dashboard like this:

On this dashboard, users can:
- View a list of their submitted posts with the corresponding statuses
- Edit or delete submitted posts
- Or submit a new post
The plugin is smart enough to detect the correct settings from the submission form to the correct posts. So you can have multiple submission forms and multiple dashboards on the same website.
How to manually set edit page attributes?
By default, the plugin implicitly gets the attributes for the submission form from the edit page. That's why you must set the edit page in the block, shortcode or page builder elements.
However, there are cases you want to explicitly set these attributes, you can do so by setting the Field group ID(s) or the Post type attributes from the block, shortcode or page builder elements settings. These values will overwrite the values in the edit page.
You can also set these attributes with a filter like this:
add_filter( 'rwmb_frontend_dashboard_edit_page_atts', function( $attributes, $edit_page_id ) {
    $attributes['post_type'] = 'book';
    return $attributes;
}, 10, 2 );
Note that the plugin only needs the field group ID(s) (id) and/or post type (post_type) attributes.
Integrations
MB Frontend Submission has integrations with the block editor (Gutenberg) and the following page builder plugins:
- Bricks
- Elementor

For these page builders, there is a new section named Meta Box when you add an element. There’ll be two new elements in this section, one is Submission Form and another is User Dashboard. They work the same way as in the corresponding blocks in Gutenberg with the live preview on the page and visually settings.
Hooks
To allow developers to do other things when the form is submitted, we have created some actions and filters.
General hooks
rwmb_frontend_redirect
This filter allows you to change the URL of the redirect page after the form is submitted. It accepts 1 parameter $config - the shortcode attributes.
$redirect = apply_filters( 'rwmb_frontend_redirect', $redirect, $config );
Note that $config['post_id'] has the submitted post ID.
Example: redirect to a page based on a submitted value:
add_filter( 'rwmb_frontend_redirect', function( $redirect, $config ) {
    // Make sure you work on the correct form.
    if ( 'my-id' !== $config['id'] ) {
        return $redirect;
    }

    // Get submitted data via $_POST.
    $value = empty( $_POST['field_id'] ) ? null : $_POST['field_id'];
    if ( 'yes' === $value ) {
        $redirect = 'https://yourdomain.com/custom-page/';
    }
    return $redirect;
}, 10, 2 );
rwmb_frontend_validate
This filter is used to check if the form is validated. You can use this filter to add a custom check for the data before it's processed.
apply_filters( 'rwmb_frontend_validate', $validate, $config );
The filter has 2 parameters:
$validate: the returned value of validation. Iftrue, then the validation is successful.false- if not and the plugin will show a default error message. If you want to show a custom error message, just return it as a string. See the Validation section above.$config: the form configuration.
Form hooks
rwmb_frontend_before_process
This action fires before the form is processed, e.g. saved or updated. It accepts one parameter $config - the form configuration, taken from the shortcode attributes.
rwmb_frontend_after_process
This action fires after the form is processed, e.g. saved or updated. It accepts 2 parameters:
$config- the form configuration, taken from the shortcode attributes.$post_id- the submitted post ID
You can use this action to do a custom redirect to your Thank you page or send an email notification.
add_action( 'rwmb_frontend_after_process', function( $config, $post_id ) {
if ( 'my-meta-box' === $config['id'] ) {
wp_safe_redirect( 'thank-you' );
die;
}
}, 10, 2 );
rwmb_frontend_before_form
This action fires before form output. It accepts one parameter $config - the form configuration, taken from the shortcode attributes.
rwmb_frontend_after_form
This action fires after form output. It accepts one parameter $config - the form configuration, taken from the shortcode attributes.
rwmb_frontend_before_display_confirmation
This action fires before the confirmation message is displayed. It accepts one parameter $config - the form configuration, taken from the shortcode attributes.
rwmb_frontend_after_display_confirmation
This action fires after the confirmation message is displayed. It accepts one parameter $config - the form configuration, taken from the shortcode attributes.
rwmb_frontend_before_submit_button
This action fires before the submit button is displayed. It accepts one parameter $config - the form configuration, taken from the shortcode attributes.
rwmb_frontend_submit_button
This filter allows you to change the submit button HTML. It accepts 2 parameters:
$submit_button- the submit button HTML.$post_id- the post ID
rwmb_frontend_after_submit_button
This action fires after the submit button is displayed. It accepts one parameter $config - the form configuration, taken from the shortcode attributes.
rwmb_frontend_before_delete
This action fires before the post is deleted. It accepts one parameter $config - the form configuration, taken from the shortcode attributes.
rwmb_frontend_after_delete
This action fires after the post is deleted. It accepts 2 parameters:
$config- the form configuration, taken from the shortcode attributes.$post_id- the deleted post ID
Post data filters
rwmb_frontend_insert_post_data
This filter is used to modify the submitted post data before it's passed to the wp_insert_post function to create a new post. It accepts 2 parameters: the array of post data and the shortcode parameters.
$data = apply_filters( 'rwmb_frontend_insert_post_data', $data, $config );
rwmb_frontend_update_post_data
This filter is used to modify the submitted post data before it's passed to the wp_update_post function to update an existing post. It accepts 2 parameters: the array of post data and the shortcode parameters.
$data = apply_filters( 'rwmb_frontend_update_post_data', $data, $config );
Post field filters
Sometimes you want to add more things to the post fields, such as making the post title required, adding a description for post content, or even adding a custom HTML before the post thumbnail. You can do that with the following post filter:
// Post title
$field = apply_filters( 'rwmb_frontend_post_title', [
    'type' => 'text',
    'name' => 'Title',
    'id'   => 'post_title',
] );

// Post thumbnail
$field = apply_filters( 'rwmb_frontend_post_thumbnail', [
    'type'             => 'image',
    'name'             => 'Thumbnail',
    'id'               => '_thumbnail_id',
    'max_file_uploads' => 1,
] );

// Post excerpt
$field   = apply_filters( 'rwmb_frontend_post_excerpt', [
    'type' => 'textarea',
    'name' => 'Excerpt',
    'id'   => 'post_excerpt',
] );

// Post date
$field = apply_filters( 'rwmb_frontend_post_date', [
    'type' => 'datetime',
    'name' => 'Date',
    'id'   => 'post_date',
] );

// Post content
$field   = apply_filters( 'rwmb_frontend_post_content', [
    'type' => 'wysiwyg',
    'name' => 'Content',
    'id'   => 'post_content',
] );
Each post field is treated as a normal Meta Box field (see here for the full list of field settings).
So, to make the post title required, you can do like this:
add_filter( 'rwmb_frontend_post_title', function( $field ) {
    $field['required'] = true;
    return $field;
} );
Post actions
rwmb_frontend_before_save_post
This action fires before the post is created or updated.
do_action( 'rwmb_frontend_before_save_post', $object );
The action accepts 1 parameter: the instance of the \MBFS\Post class, which handles the submission. It has the following public properties that you can use:
$post_type: The current post type$post_id: The submitted post ID$fields: The post fields$config: The configuration, taken from the shortcode attributes
rwmb_frontend_after_save_post
This action fires after the post is created or updated. At that time, all the custom fields in the meta box are already saved into the post meta.
do_action( 'rwmb_frontend_after_save_post', $object );
The action accepts 1 parameter: the instance of the \MBFS\Post class, which handles the submission. It has the following public properties that you can use:
$post_type: The current post type$post_id: The submitted post ID$fields: The post fields$config: The configuration, taken from the shortcode attributes
Dashboard
rwmb_frontend_dashboard_edit_page_atts
This filter allows you to explicitly set the attributes for the edit page. See User Dashboard section above.
add_filter( 'rwmb_frontend_dashboard_edit_page_atts', function( $attributes, $edit_page_id ) {
    $attributes['post_type'] = 'book';
    return $attributes;
}, 10, 2 );
rwmb_frontend_dashboard_query_args
This filter is used for changing the query args for getting posts on the dashboard page. By default, the plugin will get posts that have the same author as the current user. If you want to change this query, then use this filter.
add_filter( 'rwmb_frontend_dashboard_query_args', function( $args ) {
    $args['cat'] = 1; // Get only posts in category ID = 1.

    return $args;
} );
rwmb_frontend_welcome_message
This filter is used to change the welcome message. It accepts 3 parameters:
$message: the message content (in HTML)$user: the current user$query: the post query
rwmb_frontend_dashboard_edit_page_content
This filter is used to change the edited page content. The edit page content is used for parsing the edit form configuration. It accepts only one parameter - the content in HTML.
rwmb_frontend_dashboard_post_title
This filter is used to change the title link of posts in the post table. It accepts 2 parameters:
$title: the post title link (in HTML)$post_id: the post ID
rwmb_frontend_dashboard_edit_action
This filter is used to change the edit link for posts in the dashboard. It has 2 parameters: the edit link HTML and the post ID.
add_filter( 'rwmb_frontend_dashboard_edit_action', function( $edit_action, $post_id ) {
    $svg_icon = get_template_directory_uri() . 'icons/edit.svg';
    return '<a href="' . add_query_arg( 'rwmb_frontend_field_post_id', $post_id, 'https://domain.com/submit-page' ) . '><img src="' . $svg_icon . '""></a>';
}, 10, 2 );
rwmb_frontend_dashboard_delete_action
This filter is used to change the delete button for posts in the dashboard. It has 2 parameters: the delete button HTML and the post ID.
rwmb_frontend_before_edit_action
This action fires before the edit button is displayed.
rwmb_frontend_before_delete_action
This action fires before the delete button is displayed.
rwmb_frontend_end_actions
This action fires after all action buttons are displayed.
FAQ
How to add more field groups (meta boxes) to the frontend submission form?
You can add more field group IDs to the attribute id of the form shortcode and separate them by commas.
[mb_frontend_form id="meta-box-id-1,meta-box-id-2,meta-box-id-3" post_fields="title,content"]
How to add relationships to the frontend submission form?
Each relationship box has the ID {$relationship_id}_relationships_from and {$relationship_id}_relationships_to. You can include these IDs in the form shortcode to show it on the front end.
[mb_frontend_form id="meta-box-id-1,posts-to-page_relationships_from" post_fields="title,content"]
Why does the frontend dashboard not display the post type?
You need to add the attribute post_type to the frontend submission shortcode
[mb_frontend_form id="meta-box-id" post_fields="title,content" post_type="post-type-slug"]
Known issues
Styling
The extension outputs the default fields' HTML with CSS comes from the Meta Box plugin. The style is basic and works in most cases. However, to make it match perfectly with your theme's style, you need to do some work with CSS.
Caching
As you might know, Meta Box uses nonces to prevent misuse or malicious requests. As the nonce fields are outputted directly in the HTML, they might be cached by caching plugins such as W3 Total Cache, WP Super Cache, etc. And thus, the verification of the nonce might not work properly and break the form submission. In this case, please do not cache the page where the form is embedded (both caching plugins allow you to do that).