MB Builder
This extension helps you create custom fields, settings pages, and relationships with a user-friendly interface.
Creating custom fields
Custom fields are organized in groups. Each group is displayed as a collapsible panel below the post editor.
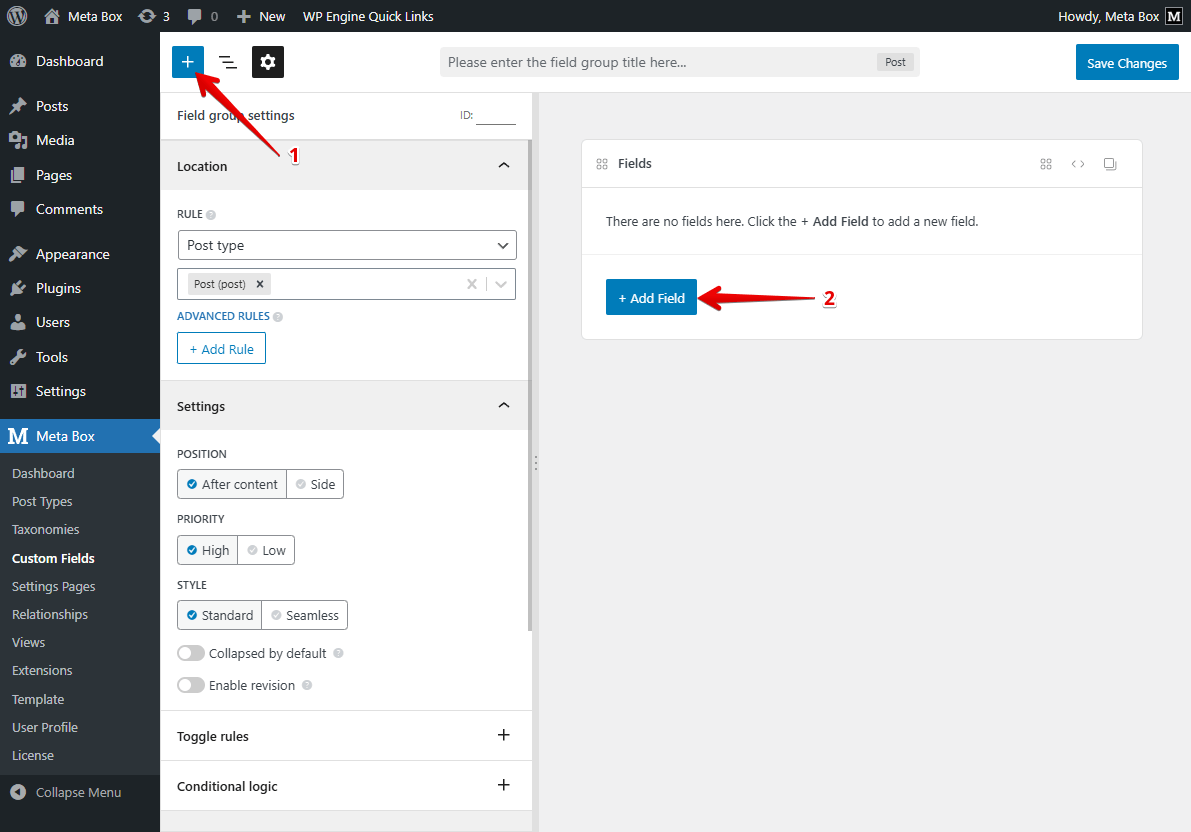
To create a field group, go to Meta Box » Custom Fields and click Add New. You'll see a screen to add fields to the group:
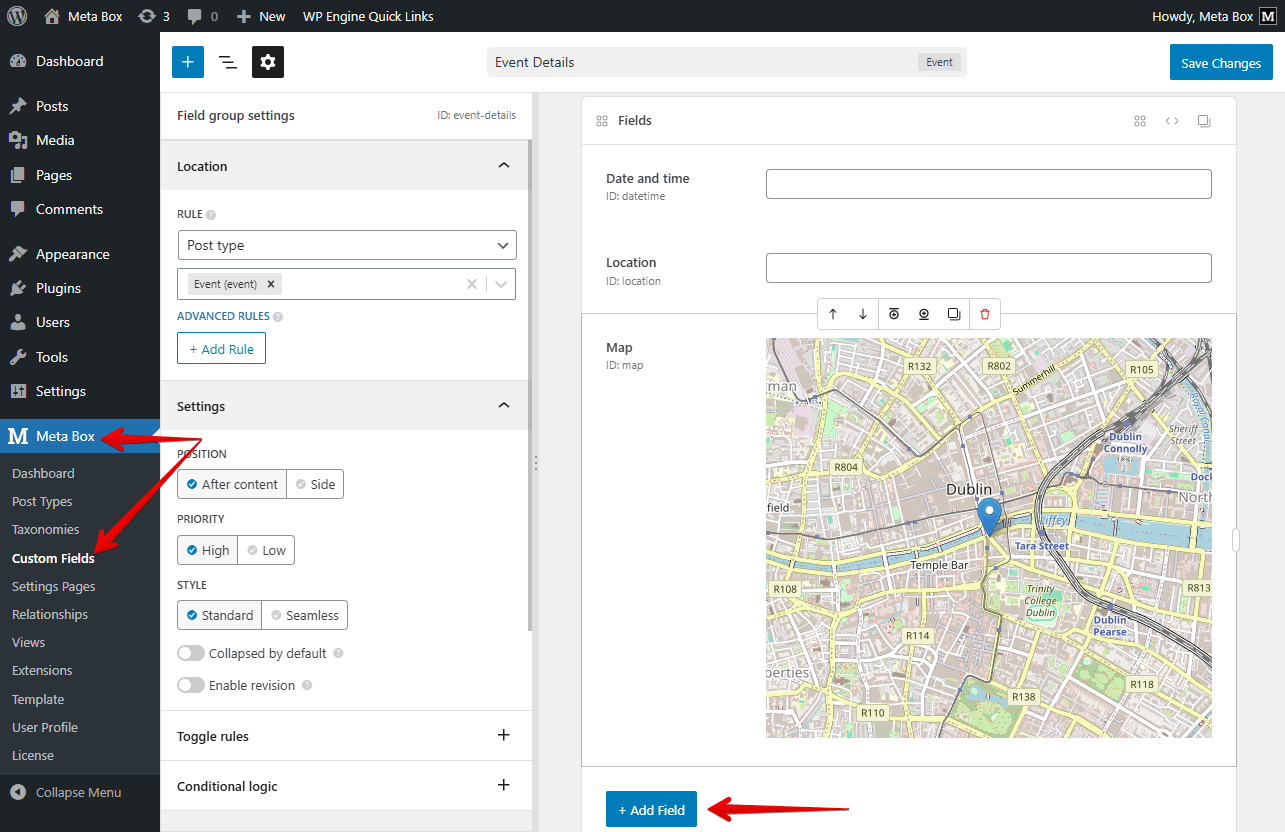
On the left side bar, there are three icons with corresponding panels: Add field, Structure, and Settings. Panels are resizable.
Enter the group title on the top and then click the + Add Field button and select a field type to add to the group. There are two buttons you can click to add a new field:
After that, a new field will appear in the field list. Clicking on that field on the preview to open the field settings panel where you can edit settings. Besides, to edit the label and ID of the field, you can double click on the preview to change them directly.
To find a field type quickly, type its name in the input box above the field list. The plugin will filter the fields and show only matched fields.
You can delete, duplicate or add a new field above/below the current field by clicking the icons in the field toolbar. To reorder fields, drag and drop them to the new positions.
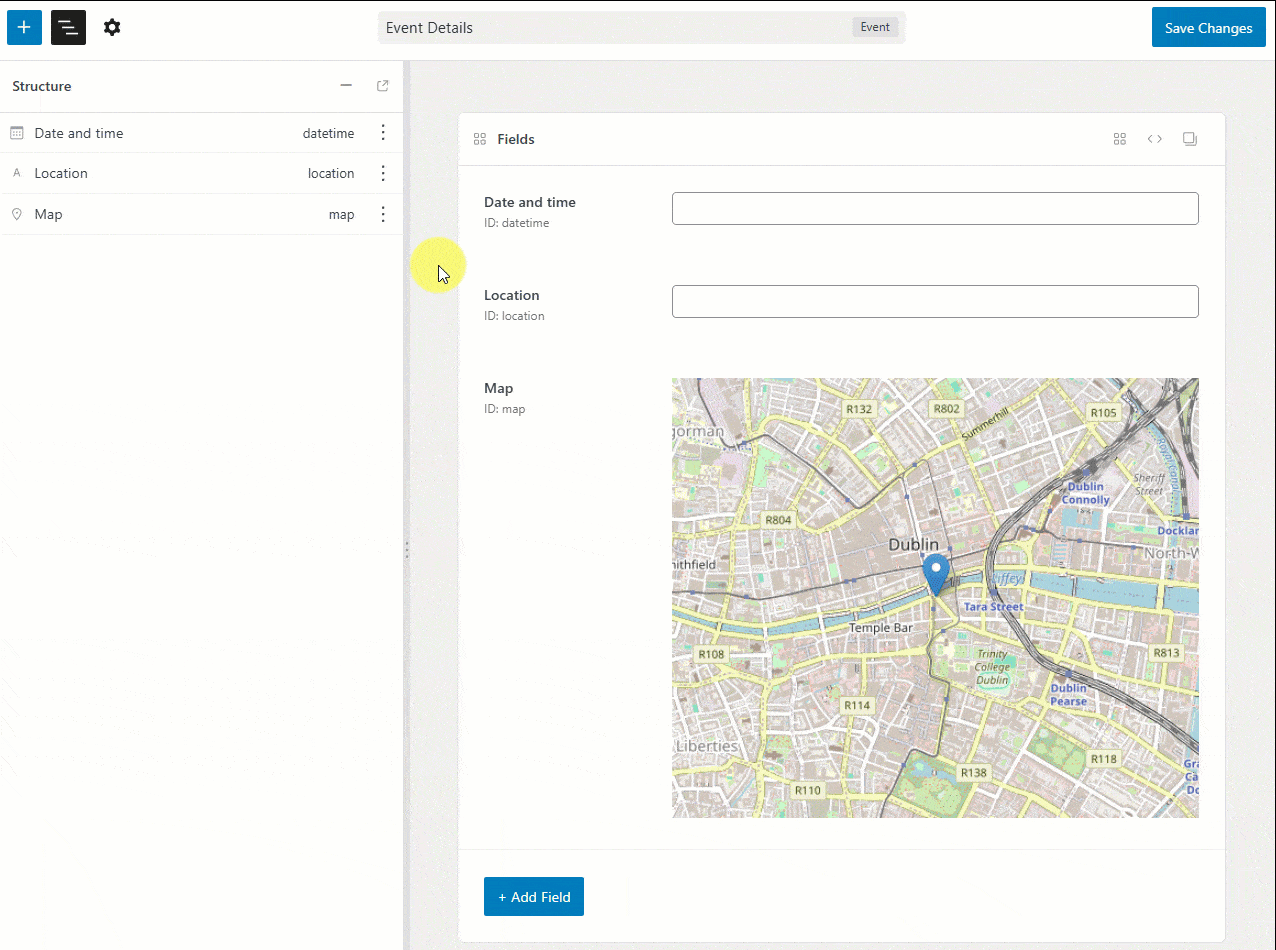
You can see the field settings and structure at the same time by opening the floating structure panel. It’s also resizable.
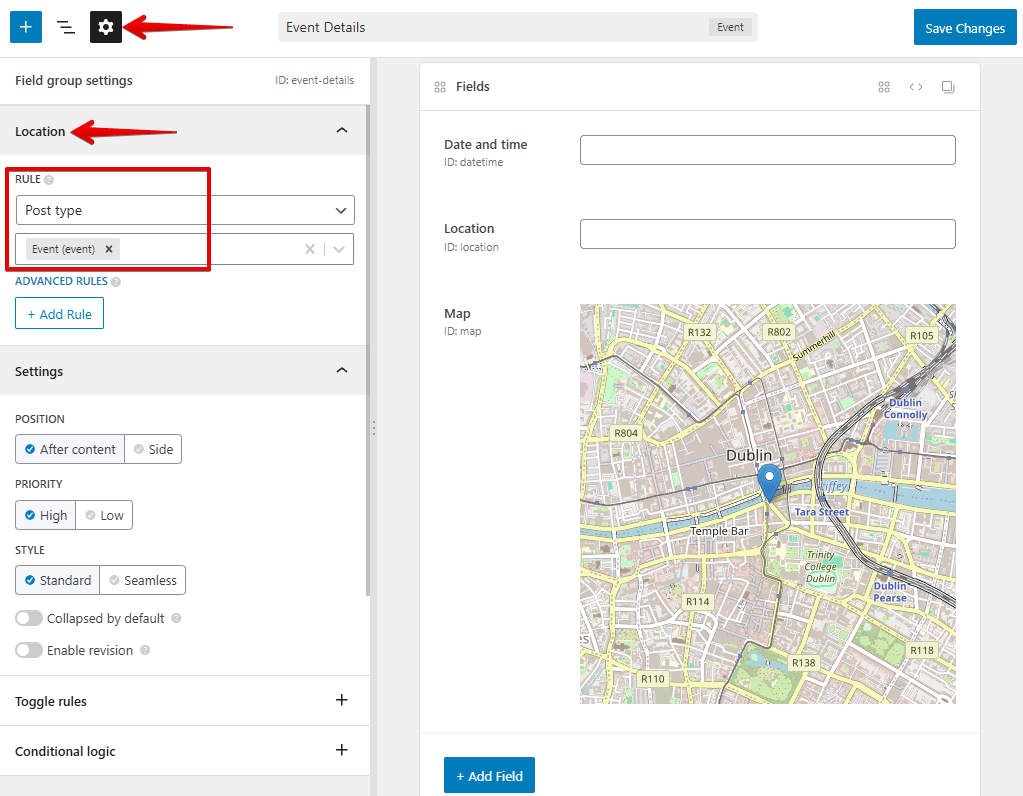
When finishing adding fields, click the Settings icon and select the location where the fields are displayed for.
After that click the Save Changes button to finish.
Field settings
When adding fields to a field group, each field has its own settings. The list of settings with detailed explanation is here. MB Builder creates UI for them.
To view and edit field settings, click anywhere in the field preview:
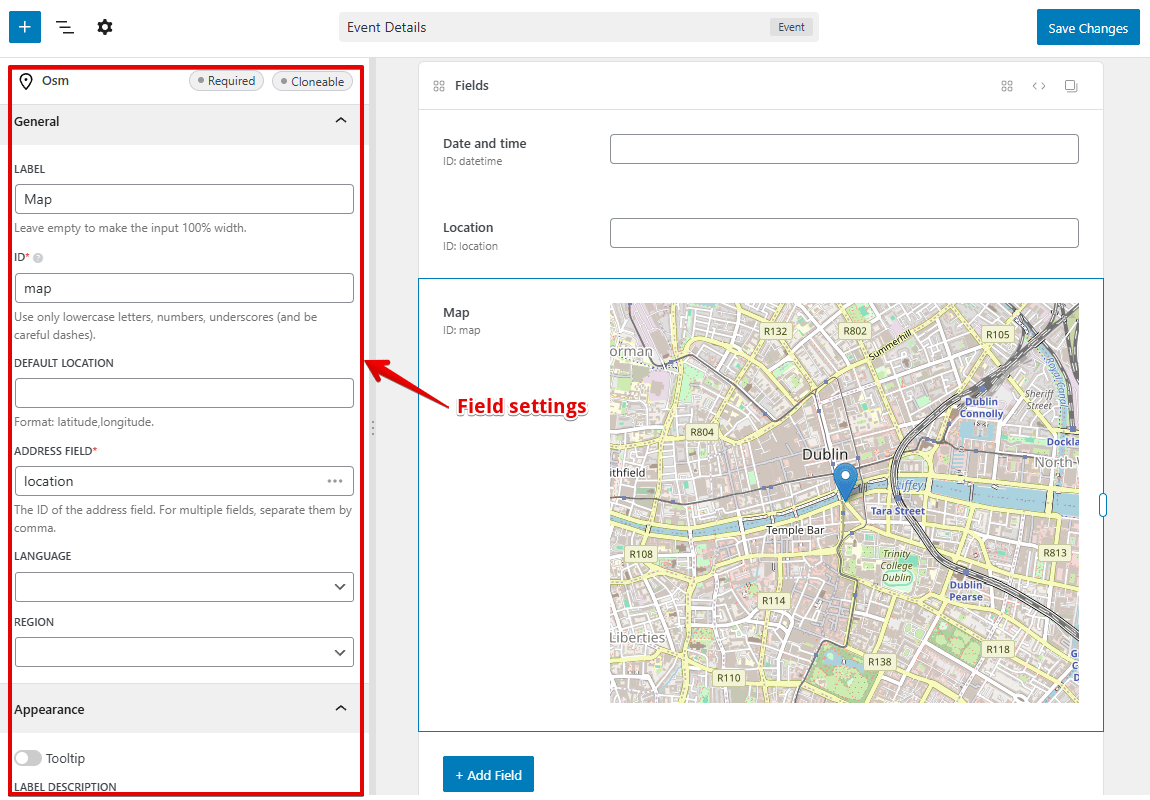
Each field settings are self-explained. We also add some tooltips next to the setting title to give you more information if needed.
All field settings are divided into some sections: General, Appearance, Conditional logic, Validation and Advanced. The General tab has most settings you need while the Appearance decides how your field display in the post editor. Besides:
- Conditional logic: if you install the MB Conditional Logic, then this part is for creating rules with UI.
- Validation: helps you to create complex validation rules.
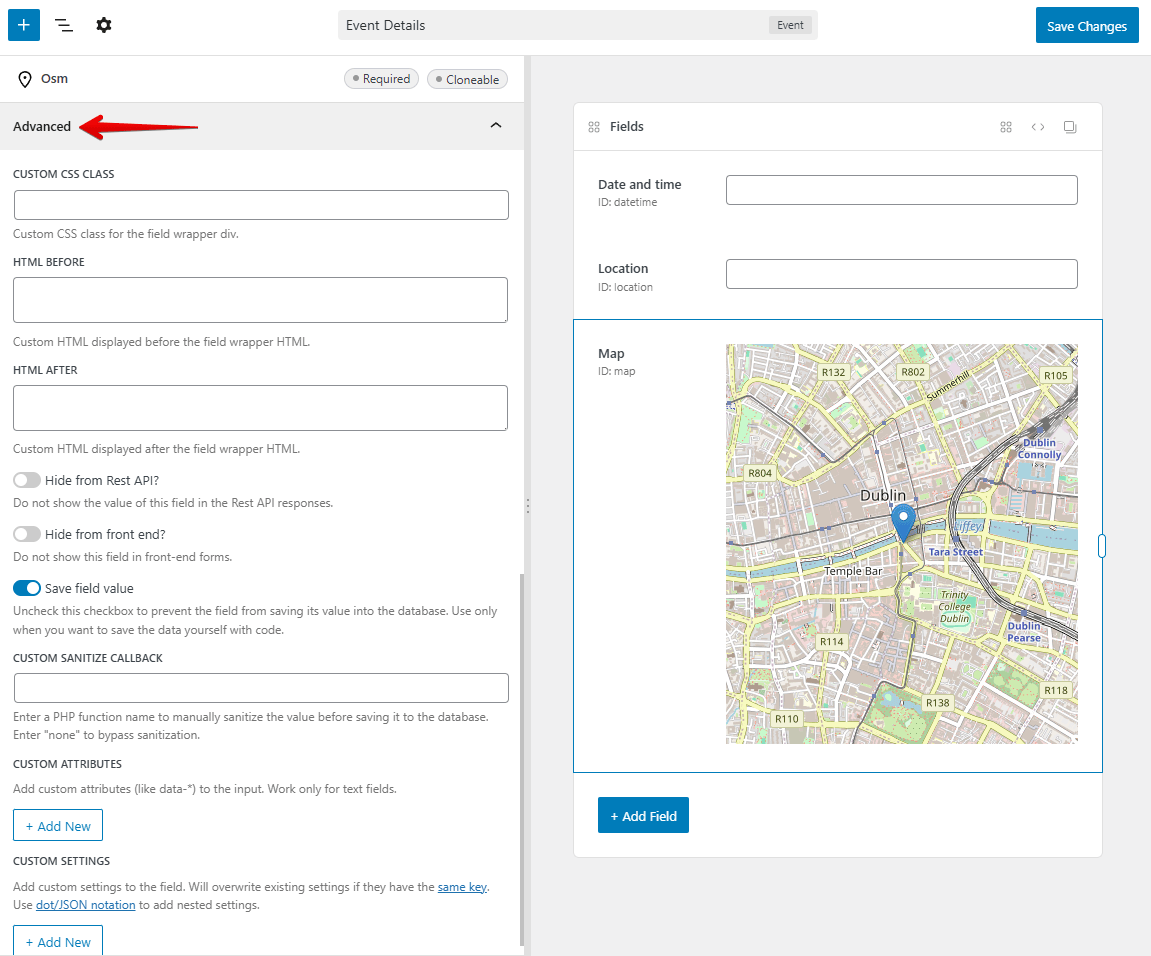
- Advanced tab has the following settings:
- Custom CSS class: if you need to cusomize the style of the field.
- Before & after: For entering custom HTML that outputed before and after the field.
- Custom sanitize callback: if you need custom sanitization.
- Save field value: if you don't want Meta Box to save the field value (which rarely happens) and you want to handle saving by yourself, then uncheck this checkbox.
- Custom HTML5 attributes: helps you add custom HTMl5 attributes to your input fields.
- Custom settings: if you want to add extra settings to the field. We'll cover it in a next section.
Note that: plugins and developers might add more settings for fields. We'll see how to do that later in this docs.
Field group settings
The field group settings are put in the tab Settings panel:

There are several settings:
- Location: where you select this field group is for posts, terms, users, comments, blocks or settings pages. For each object type, you'll be able to select corresponding post types, taxonomies or settings pages. Please note that it's required to install and activate corresponding extensions: MB Term Meta, MB User Meta, MB Comment Meta, MB Blocks, and MB Settings Page. In there, the Advanced rules allows you to add advanced rules for which category, post, user, ... the field group appears for. Requires the MB Include Exclude extension.
- Toggle rules: select which conditions to show or hide the field group. Requires the MB Show Hide extension.
- Conditional Logic: setup the conditional logic rules to toggle the field group based on other fields' values. Requires the MB Conditional Logic extension.
- Post settings, such as context, priority if you select the location is for posts.
- Custom block settings, such as block icon, render callback if you select the location is for blocks, which means creating custom Gutenberg blocks. Requires MB Blocks extension. See the Create Gutenberg blocks section below.
- Tab style and default active tab: these are the settings for MB Tabs extension.
- Custom table settings, including table name, table prefix and option to create custom table automatically. These are the settings for MB Custom Table extension. Note that if you select to create the custom table automatically, all columns will have the data type
TEXTto ensure maximum compatibility. - Advanced:
- Custom CSS class: the custom CSS class for the wrapper
divif you need to cusomize the style of the field group. - Field ID prefix: if you want to prefix all fields in the field group, then this settings is for that. It's optional, but a good practice to keep your custom fields separated from other custom fields. You can also use underscore
_as prefix to keep your fields hidden in the default WordPress Custom Fields meta box. - Custom settings: if you want to add extra settings to the field group. See below for details.
- Custom CSS class: the custom CSS class for the wrapper
Custom settings
Custom settings is a feature for both fields and field groups, which allows you to add extra settings for them in case the builder doesn't have. It's useful when you want to add your own settings or the settings the builder hasn't added yet (in this case, please let us know).
What describes in this section is applied also for similar key-value settings, including: choice field options, JavaScript options (date, datepicker, slider, ...), query args (post, taxonomy, taxonomy advanced, user) and custom HTML5 attributes.
To add custom settings, scroll down to the last setting of the Advanced section of the fields or field group. Then click + Add New button and add new settings. Like this:

Which will produce the result like this:
[
    'id'   => 'new-your-phone',
    'name' => 'New Your phone',
    'type' => 'text',

    // Custom settings.
    'mask'   => '012-345-6789',
    'enable' => false
],
Remember, MB Builder treats true, false as boolean values.
If you want to add complex custom settings, like multi-dimentional arrays:
[
    'type'       => 'post',
    'id'         => 'field_id',
    'query_args' => [
        'tax_query' => [
            [
                'taxonomy' => 'category',
                'field'    => 'slug',
                'terms'    => 'technology',
            ],
        ],
    ],
],
Then you can use the dot notation or JSON for custom attributes:
Dot notation
Dot notation is a way that let you define structural data (hierarchical data) with dots (.). Each dot (.) defines a level in your data.
If you want to enter a structural custom settings for a field like:
'my_prop' => [
    'param1' => 'Value 1',
    'param2' => 'Value 2',
    'param3' => 'Value 3',
]
This can be understood like this:
"my_prop.param1": "Value 1",
"my_prop.param1": "Value 2",
"my_prop.param1": "Value 3",
Here the params param1, param2, param3 are sub-params of the my_prop and they're defined with a dot prefixed.
Implementing that in MB Builder as follows:

Another case is when you want to add a set of data without keys. The data in PHP looks like this:
'my_prop' => [
    'Value 1',
    'Value 2',
    'Value 3',
]
Although keys are not implemented, we can understand that this list (array) uses numeric keys: 0, 1, 2. So we can rewrite it as:
'my_prop': [
    0: 'Value 1',
    1: 'Value 2',
    2: 'Value 3',
]
Similar to above, this can be understood as:
"my_prop.0": "Value 1",
"my_prop.1": "Value 2",
"my_prop.2": "Value 3",
And can be implemented as follows in MB Builder:

Combining these, you can define a complex data structure as follows (this is a post field with advanced query args):
[
    'type'       => 'post',
    'id'         => 'field_id',
    'query_args' => [
        'tax_query' => [
            [
                'taxonomy' => 'category',
                'field'    => 'slug',
                'terms'    => 'technology',
            ],
        ],
    ],
],
In MB Builder:

JSON notation
Another way to enter nested array in MB Builder, you can use JSON notation. Paste the JSON string into the value input, and this JSON will be parsed into an array in PHP.
For example, the tax_query above can be implemented like this:

Getting PHP code
For each field group, MB Buider can create a PHP code that you can copy and paste into your theme's functions.php file (or your plugin file) and then deactivate the MB Builder extension.
This is helpful if you want to:
- Share field groups to other websites which doesn't have MB Builder installed.
- Improve the performance since field groups are loaded directly from your file.
To get the code, click the Get PHP Code button on the toolbar:

On this screen, set the text domain (for field labels in case you want to translate them in a multilingual website) and the function name. Then click the Generate button to generate the code. Finally, click the Copy button to copy the code and paste it into your theme's functions.php file.
When you copy PHP code and paste it into your theme's functions.php file, you can safely deactivate MB Builder (do not deactivate Meta Box, it's still required).
For detailed instruction, please see this tutorial.
Please note that once you take the PHP code and remove the settings from the MB Builder, there's no way to edit the field group in the MB Builder directly from the exported code.
In order to do re-edit the field group, we suggest after taking the PHP code, export the field group settings from MB Builder (see the section below). Then whenever you want to edit the field group, just import it back and edit.
Export / Import
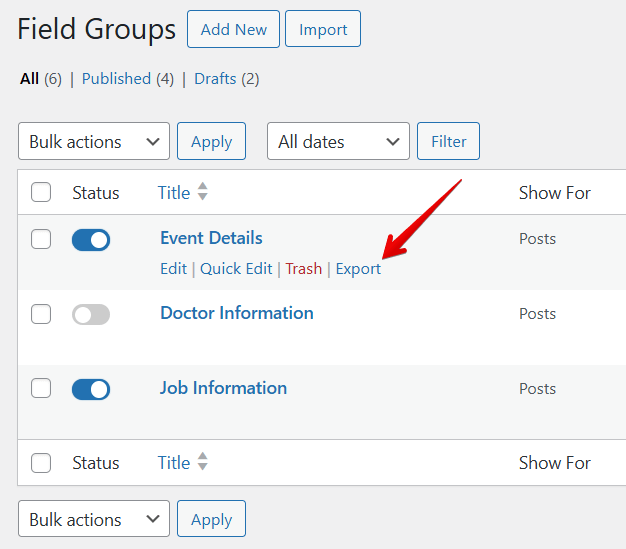
To export one or more field groups, go to the main screen Meta Box → Custom Fields. Then click the checkboxes next to the field groups' titles you want to export. Then choose Export from the Bulk Actions dropdown. Then click Apply.

Or you can export individual field group by clicking on Export link when hover the mouse over the field group title:
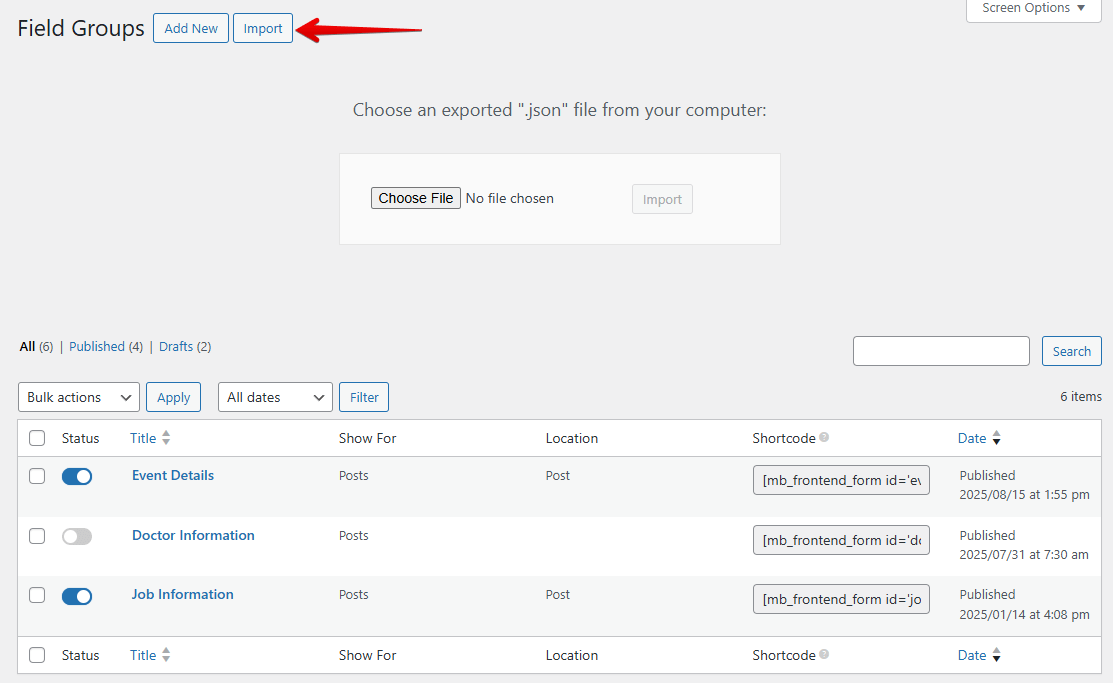
To import field groups, select the Import button at the top of the page. Then choose the downloaded file in the previous step, then press Upload file and import. That’s all!
For detailed instruction, please see this tutorial.
Video tutorial:
Creating Gutenberg blocks
Since v3.1.0, MB Builder allows you to create Gutenberg blocks visually, without writing code. See this video tutorial on how to do that:
Note that the plugin supports Twig template engine to write block template code. See Twig documentation for how to use variables, conditions and functions.
For more convenient, the plugin supports the following variables:
{{ align }}: block alignment (if the block supports it).{{ anchor }}: block anchor (if the block supports it).{{ className }}: custom CSS class name (if the block supports it).{{ is_preview }}: whether or not in preview mode.{{ post_id }}: the current post ID.
To access the field value, you can use {{ field_id }}, where field_id is the field ID. If the field returns an array (such as single_image field), you can access to field's attribute with {{ my_image.full_url }}.
Besides, the plugin also allows you to use any PHP/WordPress function via mb.function() where function is the function name. For example, the code below get the post object and output the post title:
{% set post = mb.get_post( post_id ) %}
{{ post.post_title }}
Or this code will output the site title:
{% set site_title = mb.get_bloginfo( 'name' ) %}
{{ site_title }}
Creating settings pages
This feature helps you to create custom settings pages (or Customize panels) with UI. It requires the MB Settings Page extension.
To start, go to Meta Box > Settings Pages and click Add New.
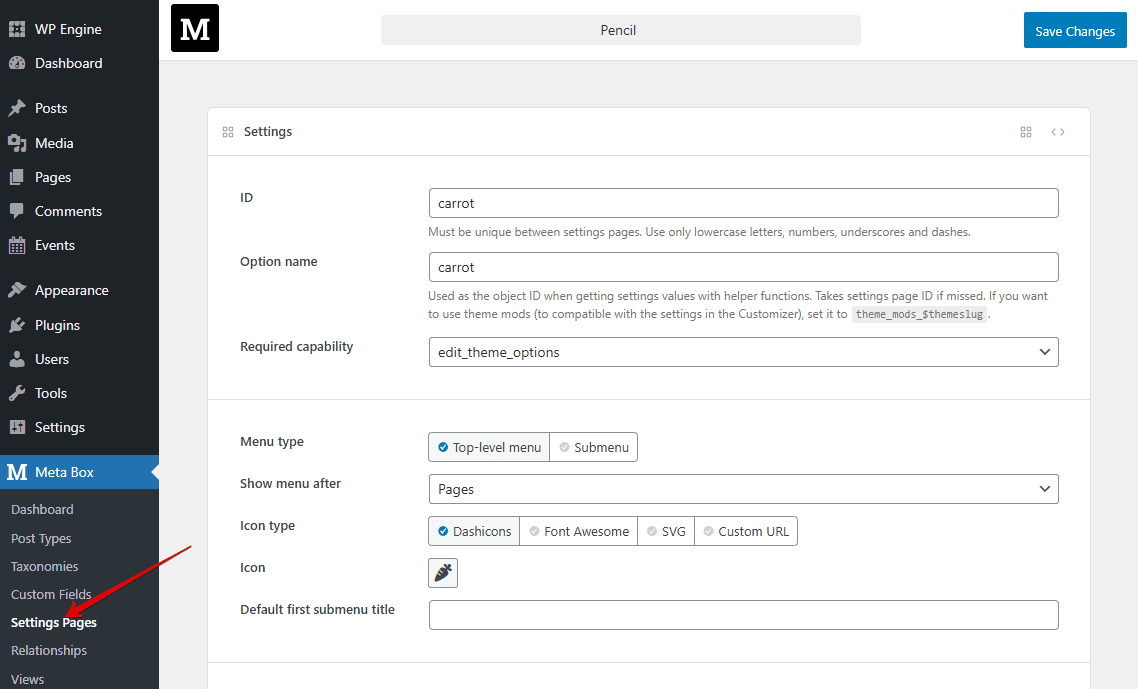
Here you can enter all the settings for the settings page. All settings are self-explained. Please see the documentation of MB Settings Page to understand them.
Creating relationships
This feature helps you to create relationships between posts, terms and users with UI. It requires the MB Relationships extension.
To start, go to Meta Box > Relationships and click Add New.
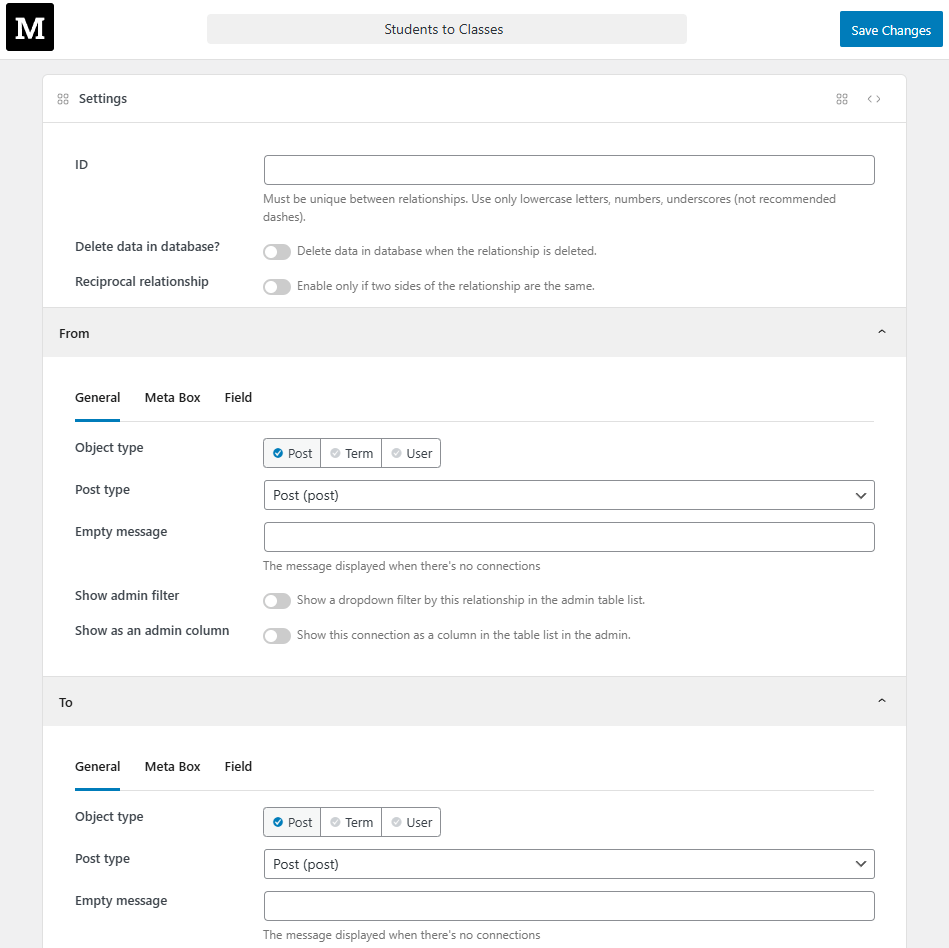
Here you can enter all the settings for each side of the relationship (From and To). For each side, there are 3 tabs of settings:
- General: for general settings such as object type and post type.
- Meta Box: for extra meta box settings. These settings are the same as the field group settings when creating custom fields.
- Field: for extra field settings. These settings are the same as the field settings (post, term or user depending on the object type).
Please see the documentation of MB Relationships to understand them.
Extending the builder
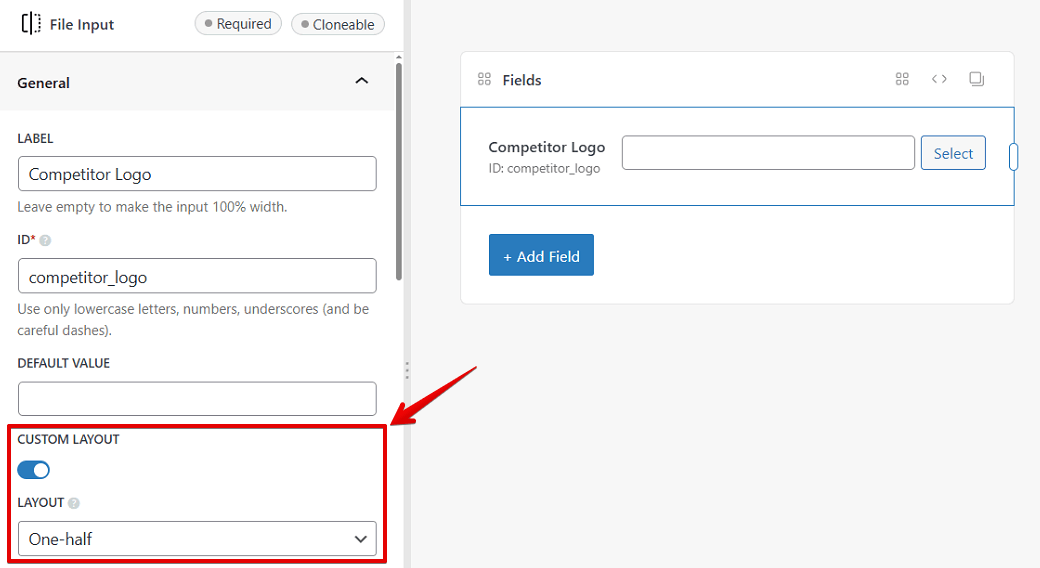
Adding custom controls to fields
If you develop extra solutions for Meta Box, then you might need to add a custom settings for fields. Luckily, MB Builder has API for you to create custom controls for these settings.
To add a control, use the following hook:
add_filter( 'mbb_field_controls', 'your_prefix_add_field_controls', 10, 2 );

function your_prefix_add_field_controls( $controls, $type ) {
	// Add a checkbox control.
	$controls[] = \MBB\Control::Checkbox( 'custom_layout', __( 'Custom layout', 'your-text-domain' ) );

	// Add a select control.
	$controls[] = \MBB\Control::Select(
		'layout',
		[
			'label'   => __( 'Layout', 'your-text-domain' ),
			'tooltip' => __( 'Select the layout for the field', 'your-text-domain' ),
			'options' => [
				'one-third'  => __( 'One-third', 'your-text-domain' ),
				'one-half'   => __( 'One-half', 'your-text-domain' ),
				'two-third'  => __( 'Two-third', 'your-text-domain' ),
				'full-width' => __( 'Full-width', 'your-text-domain' ),
			],
			'dependency' => 'custom_layout:true',
		],
		'one-half',
		'general'
	);

	return $controls;
}
The filter mbb_field_controls accepts 2 parameters:
$controls: Array of controls.$type: Field type, useful if you want to add controls to specific field types only.
Each control has a specific type (\MBB\Control::Select in the above example, which is a select dropdown) and several parameters:
- Setting name
- Control properties, which is an array:
label: the control label.tooltip: the content of the tooltip, if you want to explain what the control is for users.options: array of options for the select control, in format of'value' => 'label'.dependency: if you want to show the control only when another control has a specific value, then set this to{$other_control_setting_name}:{$value}. Optional.
- Default value. Optional.
- Settings tab:
general(default) oradvanced. Optional.
In case your control has only label property, you can set the property as a string (see the checkbox control in the above example).
List of supported control types:
| Name | Description |
|---|---|
MBB\Control::Checkbox | A checkbox |
MBB\Control::Input | An input text. You can set the 'type' => 'number' for the control property to make it accepts only numbers. |
MBB\Control::Select | A select dropdown where you can select only a single value. You need to set options property for the control as shown in the above example. |
MBB\Control::ReactSelect | A select dropdown where you can select multiple values. You need to set options property for the control and the default value must be an array. |
MBB\Control::Textarea | A textarea. |
This is the result of the above example:
Adding custom controls field groups
Similarly, you can add custom controls for the whole field group. Here is how we do to add custom controls when MB Tabs extension is activated.
add_filter( 'mbb_settings_controls', 'your_prefix_add_settings_controls' );

function your_prefix_add_settings_controls( $controls ) {
	$controls[] = \MBB\Control::Select( 'tab_style', [
		'label'   => __( 'Tab style', 'meta-box-builder' ),
		'tooltip' => __( 'Change how look and feel of tabs in MB Tabs', 'meta-box-builder' ),
		'options' => [
			'default' => __( 'Default', 'meta-box-builder' ),
			'box'     => __( 'Box', 'meta-box-builder' ),
			'left'    => __( 'Left', 'meta-box-builder' ),
		],
	] );
	$controls[] = Control::Input( 'tab_default_active', __( 'Default active tab ID', 'meta-box-builder' ) );

	return $controls;
}
The filter mbb_settings_controls accepts only one parameter - an array of controls. Each control is defined similarly as for fields.
Changing the parsed settings
In most cases, when adding a new control or a new field type, the settings are saved correctly. These settings will be parsed to a PHP array and is used by Meta Box and extensions. The parsed result is also used when you generate PHP code.
In some specific cases, you might want to set custom value to the fields instead of the value set in the controls. To do that, use the following hook:
// For fields.
$field_settings = apply_filters( 'mbb_field_settings', $field_settings );
$field_settings = apply_filters( "mbb_field_settings_{$field_type}", $field_settings );

// For field group.
$field_group_settings = apply_filters( 'mbb_meta_box_settings', $field_group_settings );
For example: you created 2 controls for custom_layout (checkbox) and layout (select) for fields (see example in the section "Adding your own field settings" above). When parsing, you don't want to set custom_layout to true if layout has a value as it's redundant. You can do that with:
add_filter( 'mbb_field_settings', 'your_prefix_parse_field_settings' );

function your_prefix_parse_field_settings( $field_settings ) {
	if ( ! empty( $field_settings['layout'] ) ) {
		unset( $field_settings['custom_layout'];
	}
	return $field_settings;
}
Video tutorial
Here is a quick video showing how to use the MB Builder to create custom fields in WordPress:
Upgrade
When updating from version 4 to version 5, the plugin automatically migrates data of field groups to compatible with the new React app. The migration process doesn't touch your existing data, so you're always safe.